2 Player Raid Tycoon Base Defense and Passive Mode
Last updated:
Protecting your factory takes walls, secured entrances, and a response when raiders attack your power. Passive Mode helps you focus on building, but your factory cash can still be stolen while it is on.
Quick Answer Overview
Build walls early, buy front and rear Laser Doors separately, then add guards and turrets. Defend exposed entrances during the 60-second Gate Power or Laser Power outage; a knocked-out turret has a separate 30-second downtime. Use the shield-shaped Passive toggle for building or returning to combat, but keep your base defenses in place even with Passive ON.
What Each Defense Protects
Defense
Role in your base
When to prioritize it
Factory walls and Perimeter Wall
Add cover and an outer enclosure; early walls reduce exposure to distant firing angles.
When your factory is still open and exposed.
Front and Rear Laser Doors
Add barriers across their respective factory entrances.
When either doorway remains open.
Walkways
Add raised passages and ladder access along the perimeter wall.
When expanding access to wall-top positions.
Guards
Add armed defenders at guard positions, including the separately purchased Wall Guard.
After addressing exposed entrances.
Turrets
Add defensive firepower, with equipment selection, tower orders, and manual control.
When you can afford the setup and want another way to defend approaches.
If cash is tight, close exposed approaches before saving for expensive firepower. A guard or turret does not fill an open doorway, and walls alone still leave entrances to protect.
Build Walls and Protect Both Entrances
Collect enough factory cash, then step onto the labeled construction pads. Front and rear Laser Doors are separate purchases: buying one does not complete the other entrance.
Build the initial walls for $1,000. Find BUILD THE WALLS beside the cash collector, where the factory floor meets the grass. The walls add cover but leave a doorway open.
Add the outer enclosure for $3,000. Step onto PERIMETER WALL beside the outdoor gate frame.
Protect the front entrance for $2,500. Use LASER DOORS at the doorway beside the conveyors. Horizontal laser bars appear in the door frame.
Protect the rear entrance for $2,500. Cross the ground-floor conveyors to REAR LASER DOORS, beside the back doorway. When playing together, have each player cover the rear entrance on their own side.
For the outer-wall expansion, buy Walkways for $4,000 inside the perimeter wall beside the weapon display circles. This adds raised passages and ladder frames, then reveals the Laser Fence $5,000 pad nearby. The separate Power Supply $5,000 purchase pad is beside the base gate.
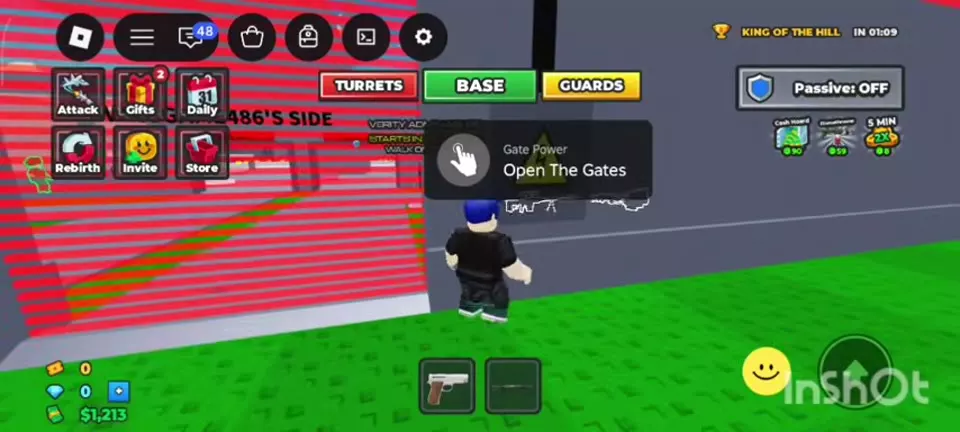
To open a closed gate yourself, approach Gate Power beside it and use Open The Gates. At the rear laser doorway, Rear Door Power offers Open The Doors.
During an attack, distinguish incoming fire from an actual outage:
Alert or state
What it means
What to do
BASE UNDER ATTACK
Names the attacker and the device being shot, such as Gate Power, Laser Power, or a turret. The barrier may still be active.
Identify the threatened approach and respond before it fails.
GATE POWER DOWN
Gate Power is disabled, opening the gate for 60 seconds.
Defend the opening through its countdown.
LASER POWER DOWN
The laser doors open for 60 seconds, with a timer separate from Gate Power.
Cover the affected doorway and follow its own countdown.
Gate Power restored
The gate barrier returns.
Keep dealing with anyone already inside; the returning barrier can obstruct their escape.
INTRUDER!
Marks someone intruding in the base area.
Use the marker to locate the threat.
RAIDED
Identifies a player involved in a raid.
Locate the raider and watch for a chance to recover your cash.
If BAG DROPPED says someone dropped your money, touch that bag and look for the green cash-return notification. A surviving teammate can keep fighting the raider and help recover money. For the carrying and delivery mechanics, see the raid and loot guide.
Turret downtime is separate:TURRET DOWN disables a knocked-out turret for 30 seconds, followed by a back online notification. Cover the approach while it recovers.
Turn Passive Mode On or Off
You can still lose factory cash to a raid with Passive ON. Use it to focus on construction, while keeping your entrances and defenses ready.
Find the shield-shaped Passive control in the left-side controls or upper-right corner, depending on your interface layout.
Select ON for the mode labeled no fighting, or OFF to return to combat.
If Wait appears, let the countdown finish before switching again. An OFF label can appear while a wait is still running, so read both the state and the timer.
Switching OFF can be followed by a 30-second wait before another switch. In the Vietnamese interface, the control is labeled Thụ động, and Chờ means wait.
Passive ON can surround your character with a blue sphere, but a blue effect alone does not identify the mode—one can also appear after respawning. Read the Passive control to determine its state.
Add Guards and Turrets
Guard Tower and Wall Guard are separate purchases. The $100,000 Guard Tower unlocks a $40,000 Wall Guard pad beside the tower and ladder. Buying the tower provides the structure; buying the Wall Guard adds the armed defender on the wall. Elevated guards remain vulnerable to distant gunfire, so use them alongside entrance barriers and your own defense.
For an installed turret, open TURRETS and confirm that your chosen model says EQUIPPED. OWNED means it has been purchased, not necessarily selected. Check TOWER ORDERS and choose DEFEND when you want the defense order instead of HOLD FIRE.